1.1 First Login to the Device #
By default, AsterNOS devices both support serial console-based logins and SSH-based logins.
When logging into the switch for the first time, you will need to log in from the Console port (hereafter referred to as the serial port) and configure the management port IP to log into the switch via SSH. Local login via the serial port is the most basic way to log in to the device and is the basis for configuring login through other methods. The steps are as follows.
1.1.1 Connections
This series of switches uses RJ-45 connectors for the serial ports. The distribution of the serial ports varies from model to model and is generally located on the front panel of the device, with some on the rear panel. This can be confirmed by the interface designation “CON”, as shown in Figure 1-1 below.

After the device is normally powered up, the serial port of the device is connected to a server or PC, and the communication parameters of this user terminal are required to be configured in line with the default setting of the switch serial port in order to communicate. The default values for each parameter are shown in the table below.
| Parameters | Default value |
|---|---|
| Transmission speed | 115200bit/s |
| Flow control method | No flow control |
| Calibration method | No calibration |
| Stop bits | 1 |
| Data bits | 8 |
1.1.2 Serial Login
1.1.2.1 Windows system
Please refer to the specific software guide for the use of different terminal emulation software, here is an example of using Xshell in Windows 10 environment.
1.First go to the system’s device manager and confirm the serial port name.
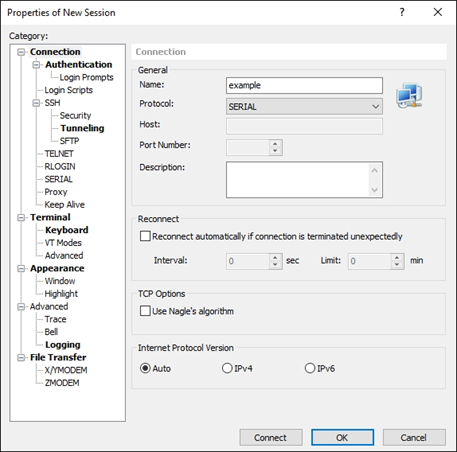
2.Go to Xshell, select File –> New in the navigation menu, create a new session, enter a name and select SERIAL (serial interface) for the protocol.
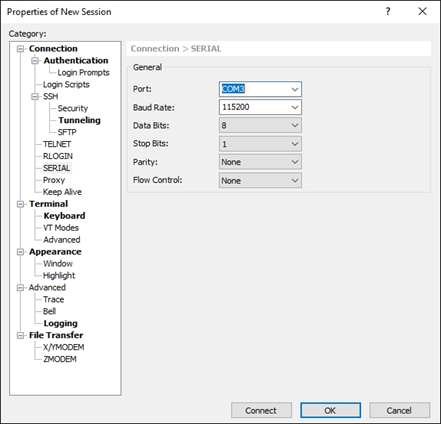
3.Select “SERIAL” or “Serial” in the “Category” window on the left to set the communication parameters, select COM3 for the port and 115200 for the baud rate, then Click Connect.
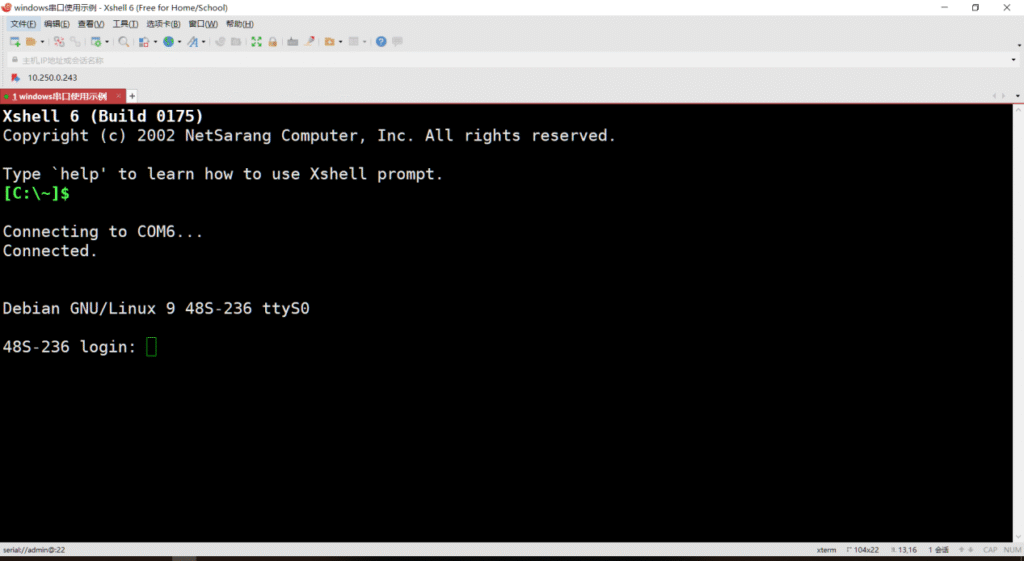
4.Type Enter and you can see that the terminal prompts to enter the login user name and password.
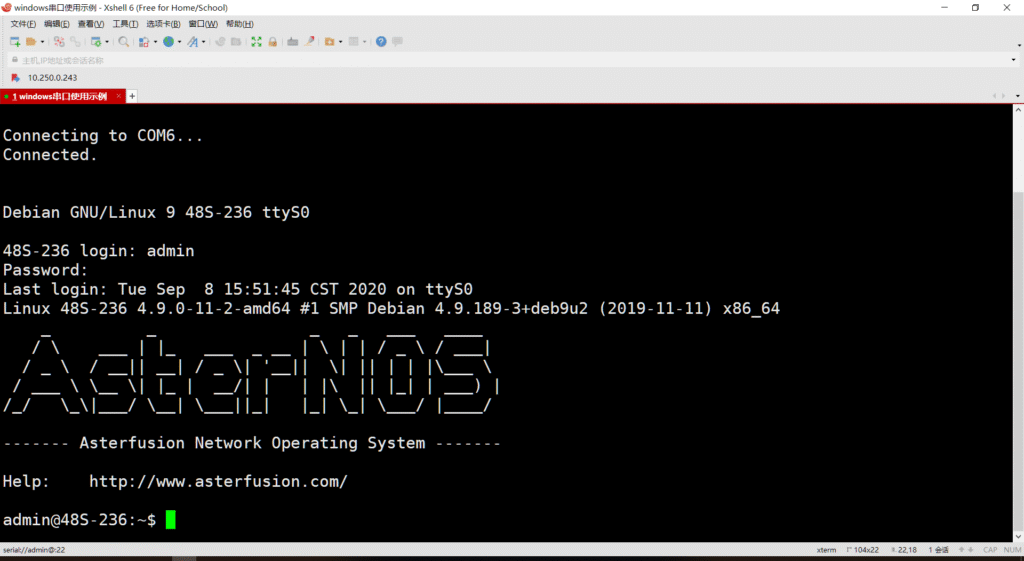
5.Enter the username and password, the default is admin/asteros, to access the switch.
1.1.2.2 Linux system
This is explained in detail using the serial terminal software minicom as an example (Linux systems generally come with minicom software).
1.First go to the minicom tool and in the terminal type the command.
sudo minicom -s2.Select Serial port setup to enter the serial port configuration interface.
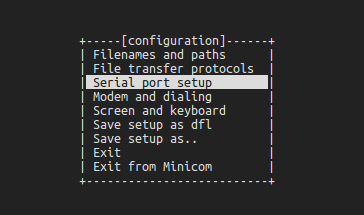
3.Enter A: Change the port number, enter. Note that it should match the actual port number.
Enter E: Change the baud rate to 115200, enter.
Enter again to save this configuration and return to the initial menu.

4.Select Exit and enter.
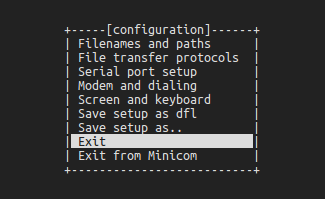
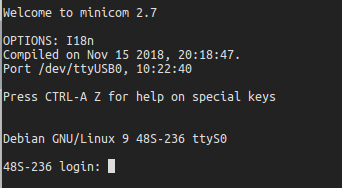
5.When you enter the serial login screen, you have to press enter and the screen prompts you to enter the login username and password.
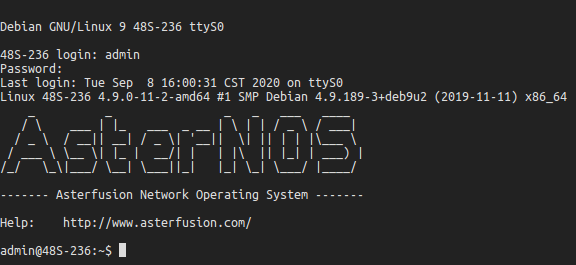
6.Enter the username and password, the default is admin/asteros, to access the switch.
1.1.3 Configure Operation Mode
AsterNOS supports two configuration methods in order to meet the habits of different users.
- Linux Bash style
Bash mode, also named SONiC command line. In this mode, the switch is managed by config and show series commands. There is no concept of views, each command is organized independently; the configuration file stores the results of configuration rather than the commands.
- CISCO-LIKE style
CLI mode, also named KLISH command line. In this mode, the switch is managed by commands provided by sonic-cli. Following the CLI style of traditional commercial switches, commands are organized under various views; the configuration file stores the commands that have been configured.
| Operation | Commands | Description |
|---|---|---|
| Enter global configuration view | configure terminal | - |
| Configuration operation mode | cli-mode {bash|cli} | Requires user confirmation for execution; Available for admin and root users only |
| Return to the enable configuration view | exit | - |
| Enter the Bash platform | system bash | Available for admin and root users only |
| Return to the CLI platform | exit | This command is run in the bash operator platform |
When the switch is delivered from the factory, it defaults to CLI configuration mode.
Attention should be paid to the following points.
- Since the commands and configuration storage of the two configuration interfaces mentioned above do not correspond to each other one by one, and there are also differences in the processing of the background, the two configurations cannot be converted simultaneously. If you need to switch the configuration interface, we suggest you to clean up the configuration first, otherwise there may be incompatible configuration problems.
- When cli-mode is changed, the system will automatically restart the bgp service to avoid incompatible configurations.
1.1.4 Configure the Management Port IP
SSH is short for Secure Shell. When a user logs in to a device remotely through a network environment that cannot be guaranteed to be secure, SSH provides security using encryption and strong authentication to protect the device from attacks such as IP address fraud, plaintext password interception, etc.
By default, AsterNOS 3.0 and above devices support SSH-based logins with the default credentials of admin/asteros.
| Operation | Commands | Description |
|---|---|---|
| Enter global configuration view | configure terminal | - |
| Enter the management port configuration view | interface mgmt 0 | - |
| Configure the management port IP address | ip address A.B.C.D/M gw A.B.C.D ipv6 address A::B/M gw A::B | IPv4 address with subnet mask /32 is not allowed to be configured. Addresses with subnet mask /31 is allowed. In other subnet masks, addresses with the host portion all-zeros or all-ones are not allowed. IPv6 address with subnet mask /127 or /128 is not allowed to be configured. In other subnet masks, addresses with the host portion all-zeros are not allowed, but all-ones are allowed. |
| Exit the management port configuration view | exit | - |
| Save configuration | write | - |
1.1.5 Configure the Device Name
The user can configure different names for the devices in the network for easy differentiation.
| Operation | Commands | Description |
|---|---|---|
| Configure the device name | hostname hostname | This change will take effect when the user logs out and logs in again. |
| Save configuration | write | - |
1.1.6 Example of First Login Device Configure
1.Network requirement
After logging into the device for the first time via the Console port, basic configuration (device name and management port IP) is carried out to enable PC2 to log into the device via SSH. Route between PC2 and the device is reachable.
2.topology

3.Configuration steps
(1) PC1 logs in to the device via the device serial port as described in1.1.2 .
(2) Configure CLI mode.
admin@sonic:~$ sudo config cli-mode cli(3) Configure the management port IP.
admin@sonic:~$ sudo sonic-cli
sonic# configure terminal
sonic(config)# interface mgmt 0
sonic(config-mgmt-0)# ip address 10.250.0.204/24 gw 10.250.0.254
sonic(config-mgmt-0)# exit
sonic(config)# exit
sonic# write
(4) Configure the device name.
sonic# hostname switchA
sonic# write
4.Configure verification
Accessing the terminal emulation software on the PC, you are able to log in to the switch normally.
~ ssh admin@10.250.0.204
admin@10.250.0.204's password:
Linux sonic-204 4.9.0-11-2-amd64 #1 SMP Debian 4.9.189-3+deb9u2 (2019-11-11) x86_64
   _          _                _   _   ___   ____
  / \    ___ | |_   ___  _ __ | \ | | / _ \ / ___|
 / _ \  / __|| __| / _ \| '__||  \| || | | |\___ \
/ ___ \ \__ \| |_ |  __/| |   | |\  || |_| | ___) |
/_/   \_\|___/ \__| \___||_|   |_| \_| \___/ |____/

------- Asterfusion Network Operating System -------

Help: http://www.asterfusion.com/

Last login: Wed Jun 23 06:44:22 2021 from 192.168.10.198
admin@switchA:~$
1.2 Familiarity with Using the Command Line #
This series of switches offers a wide range of features and correspondingly a wide range of operations such as status checking and function configuration. We also provide an accompanying command line manual documentation.
1.2.1 Common views
| Model name | Mode entry method | System Prompt | Withdrawal Methods | Function description |
|---|---|---|---|---|
| Privileged user mode | Execute the sonic-cli command in the system terminal | Switch# | exit | Performs system-related configuration; display device configuration and status information |
| Global configuration mode | Execute the configure terminal command in privileged user mode | Switch(config)# | exit or end | Configure the global parameters required for the operation of the device |
| Interface configuration mode | Execute the interface family of commands in global mode | Switch(config-if-XXX)# Switch(config-lo-XXX)# Switch(config-vlanif-XXX)# Switch(config-lagif-XXX)# | exit or end | Perform interface-related configuration |
| Access list configuration mode | Execute the access-list series of commands in global mode | Switch(config-l3-acl-{name})# Switch(config-l3v6-acl-{name})# Switch(config-mirror-acl-{name})# Switch(config-flow_control-acl-{name})# | exit or end | Configure ACL access lists |
| VLAN configuration mode | Execute vlan vlan-id in global mode | Switch(config-vlan-id)# | exit or end | Perform VLAN-related configuration |
NOTE:
exit will fall back to global configuration mode and end will fall back to privileged user mode.
1.2.2 Commonly Used Keywords
| Key words | Description |
|---|---|
| no | Cancel or turn off a setting. |
| show this | Show current view configuration. |
| configure terminal | Enter global mode. |
| reload | Reload the configuration. |
| reboot | Reboot the switch. |
| write | Save current configuration. |
| shutdown | Disable/shutdown ports. |
| end | Revert to privileged user mode. |
| exit | Return to top or log out. |
1.2.3 Edit Command Line
CLI provides basic command line editing functionality.
NOTE:
The command line keyword is case insensitive.
1.2.4 Command Line Operation Tips
After entering an incomplete keyword, press the Tab or Space bar and the system will automatically complete the keyword.
1.2.5 Help on Using the Command Line
If you have problems using the command line, you can use the help function to get help without having to remember a lot of complicated commands.
When entering a command, press the Tab key and the system will list the set of keywords that can be matched; type “?” and the system will give you an explanation of the keyword hint or the meaning of the parameter.
For example:
sonic# show <tab>
acl arp counters history image interface link-aggregation
lldp mac-address platform running-config startup-config sub-interface traffic
sonic# configure terminal
sonic(config)# access-list l3 test ingress <tab>
<cr>
sonic(config)# access-list l3 test <enter>
Syntax error: The command is not completed
sonic(config)# access-list l3 test1 ingress
sonic(config-l3-acl-test1)# ?
end Exit to the exec Mode
exit Exit from current mode
no Negate a command or set its defaults
rule Add an access list entry
show show running-config

sonic(config-l3-acl-test1)# rule ?
rule ID (0..500)

sonic(config-l3-acl-test1)# rule 1 ?
source-mac      Specify source mac address
destination-mac Specify destination mac address
ethernet-type   Specify ethernet protocol type
outer-vlan      Specify outer VLAN id
vlan-pri        Specify outer VLAN priority
NOTE:
- An incorrect command is entered or the command is not applicable to this view and a carriage return will not be allowed.
- If the command line is not entered in full, a prompt will be given.
- <cr> means there are no keywords or parameters in this position, just type enter to execute.
1.2.6 View History of Commands
The device can automatically save the history of commands typed by the user. When the user needs to enter a command that has been previously executed, the device’s saved history of commands can be recalled.
| Operation | Commands | Description |
|---|---|---|
| Show history commands | show history | - |
| Access the last history command | [Upper cursor key] | - |
| Access the next history command | [Lower cursor key] | - |
1.3 Configuration File Management #
1.3.1 Definition
Configuration file refers to a collection of configurations running on a device.
Through the management of system configuration files, it enables configuration viewing, comparison, backup and restoration to avoid loss of user configurations and facilitate configuration migration.
1.3.2 Format of the Configuration File
The configuration file for this series of switches is in JSON (JavaScript Object Notation) format, a lightweight data interchange format with the usual .json suffix.
1.3.3 View Profile
By default, the system configuration file is stored in the /etc/sonic directory. The default configuration file is named config_db.json, which is modified when a configuration save or restore operation is performed and determines the starting configuration of the device at the next boot. In addition, a backup copy of the configuration file is stored in this directory, marked with a timestamp, so that the user can easily restore the configuration.
1.3.4 View Current Configuration
The user can view the entire configuration or specify a collection of configurations for a particular module.
| Operation | Commands | Description |
|---|---|---|
| View current configuration | show running-config | - |
1.3.5 Configuration Save
When the user logs into the device, the device configuration can be modified through operations such as the command line, but these configurations are temporary. If configuration persistence is required, the modified configuration should be manually saved and the current configuration updated to the default configuration file config_db.json, otherwise the device’s configuration will revert to the pre-modification after reboot.
| Operation | Commands | Description |
|---|---|---|
| Save configuration | write | - |
| View saved configuration | show startup-config | - |
1.3.6 Configuration Reload
Must know:
- Please make sure that the current configuration has been saved if you need it to remain in effect after reload, or you will lose it.
| Operation | Commands | Description |
|---|---|---|
| Configuration reloading | reload | - |


