Vlan Configuration on Asterfusion Enterprise SONiC Distribution Switch
1 Purpose
This article mainly explains the vlan configuration on Asterfusion enterprise SONiC switches.
By reading this article, users can quickly master the configuration method of vlan on Asterfusion SONiC switch.
2 Model and Version
Model:
CX-N series switches
CX-M series switches
Version:
AsterNOSv3.1
3 Basic vlan configuration instructions
Vlan configuration is a basic function. Asterfusion Enterprise SONiC Distribution CX-N series switches support 4096 vlans, of which vlan 0 and vlan 4095 are reserved vlans, vlan 1 is the default vlan, and vlan 4094 is a dedicated vlan for high-availability routing policy scenarios, so the vlan_id range that users can create is 2-4093.
3.1 Configure vlan
vlan vlan-id vlan-id# range:1-4094.Example:
sonic(config)# vlan vlan-id 1003.2 Configure vlan member ports
interface ethernet interface-name
Switchport
switchport {trunk|access} vlan vlan-id
# Enter interface view.
# Convert to Layer 2 interface mode.
# Add physical interface to vlan.Example:
sonic(config)# interface ethernet 0/1
sonic(config-if-0/1)# switchport
sonic(config-if-0/1)# switchport access vlan 100
3.3 Configure vlan interface IP address
interface vlan vlan-id
ip address {A.B.C.D/M|A::B/M}
# Enter vlan interface view.
# Configure vlan interface IP address.Example:
sonic(config)# interface vlan 100
sonic(config-vlan-10)# ip address 10.0.10.1/24
3.4 Configure vlan interface MTU(optional)
interface vlan vlan-id
mtu mtu
# Enter vlan interface view.
# Configure vlan interface mtu.Example:
sonic(config)# interface vlan 100
sonic(config-vlan-10)# mtu 4094
3.5 Configure vlan interface mac address(optional)
interface vlan vlan-id
mac-address HH:HH:HH:HH:HH:HH
# Enter vlan interface view.
# Configure vlan interface mac address.Example:
sonic(config)# interface vlan 100
sonic(config-vlan-10)# mac-address 00:11:22:33:44:55
3.6 Configure VLAN interface mac address learning(optional)
interface vlan vlan-id
mac-address learning
# Enter vlan interface view.
# Enable mac address learning on the vlan interface.Example:
sonic(config)# interface vlan 100
sonic(config-vlan-10)# mac-address learning
3.7 Configure the DHCP Relay function(optional)
configure terminal
dhcp_relay relay-name {v4|v6}

uplink {ethernet|lag|vlan} id
downlink vlan id
server ip-address
# Enter global configuration view.
# Add the DHCP relay group and enter the configuration view,relay-name:DHCP relay group name.
# Configure uplink port.
# Configure downlink port.
# Add DHCP server IP.Example:
sonic#configure terminal
sonic(config)# dhcp_relay dhcp1 v4
sonic(config-dhcp-relay-dhcp1)#uplink ethernet 0/5
sonic(config-dhcp-relay-dhcp1)#downlink vlan 100
sonic(config-dhcp-relay-dhcp1)#server 192.168.100.110
4 Vlan configuration case
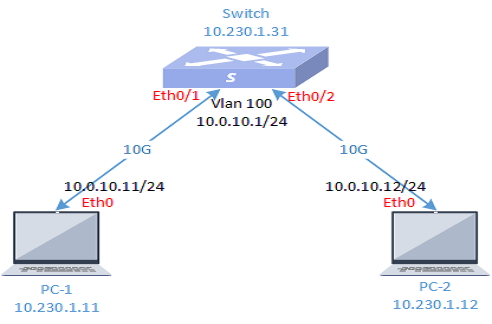
4.1 Case 1 Communication between vlans of the same device
4.1.1 Requirements
User 1 and User 2 belong to different vlans and are located in different network segments. User 1 and User 2 need to be able to communicate with each other. use vlan configuration to do this.
4.1.2 Topology
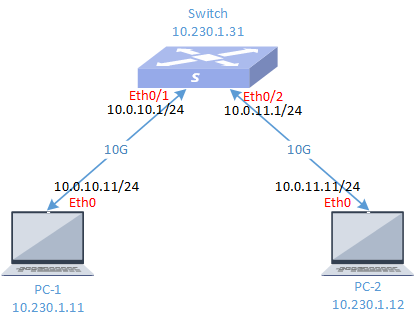
4.1.3 Configuration steps
Step 1
Switch
sonic# configure terminal
sonic(config)# vlan 100
sonic(config-vlan-100)# exit
sonic(config)# vlan 200
sonic(config-vlan-200)# exit
sonic(config)# interface ethernet 0/1
sonic(config-if-0/1)# switchport access vlan 100
sonic(config-if-0/1)# exit
sonic(config)# interface ethernet 0/2
sonic(config-if-0/2)# switchport access vlan 200
sonic(config-if-0/2)# exit
sonic(config)# interface vlan 100
sonic(config-vlanif-100)# ip address 10.0.10.1/24
sonic(config-vlanif-100)# exit
sonic(config)# interface vlan 200
sonic(config-vlanif-200)# ip address 10.0.11.1/24
sonic(config-vlanif-200)# exit
Step 2
Configure two PCs IP addresses and gateways.
PC-1
[root@localhost ~]# ifconfig eth0 10.0.10.11/24
[root@localhost ~]# route add default gw 10.0.10.1

PC-2
[root@localhost ~]# ifconfig eth0 10.0.11.11/24
[root@localhost ~]# route add default gw 10.0.11.1
4.1.4 Verify network configuration
The two PCs can ping each other.
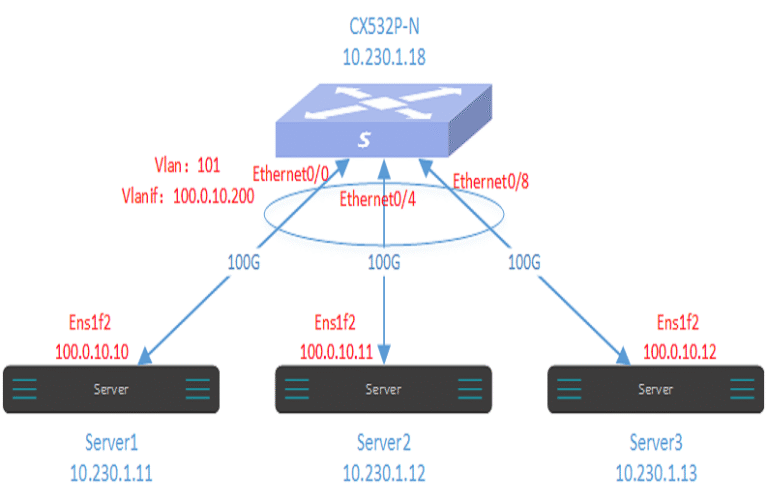
4.2 Case 2 Communication within a cross-device vlan
4.2.1 Requirements
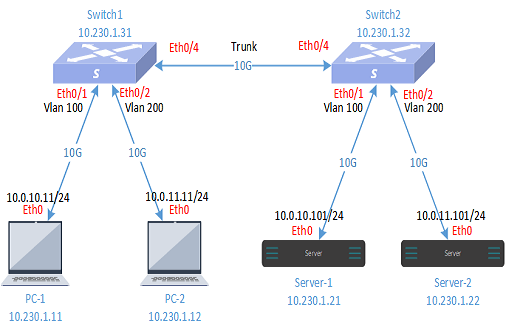
As shown in the topology diagram, PC1 and PC2 belong to different vlans and can only access servers server1 and server2 belonging to this vlan. They cannot access each other. use vlan configuration to do this.
4.2.2 Topology

4.2.3 Configuration steps
Step 1
Configure the interconnection IP addresses of three switches.
Switch1
sonic# configure terminal
sonic(config)# vlan 100
sonic(config-vlan-100)# exit
sonic(config)# vlan 200
sonic(config-vlan-200)# exit
sonic# configure terminal
sonic(config)# interface ethernet 0/1
sonic(config-if-0/1)# switchport access vlan 100
sonic(config-if-0/1)# exit
sonic(config)# interface ethernet 0/2
sonic(config-if-0/2)# switchport access vlan 200
sonic(config-if-0/2)# exit
sonic(config)# interface ethernet 0/0
sonic(config-if-0/0)# switchport trunk vlan 100
sonic(config-if-0/0)# switchport trunk vlan 200
sonic(config-if-0/0)# end
Switch2
sonic# configure terminal
sonic(config)# vlan 100
sonic(config-vlan-100)# exit
sonic(config)# vlan 200
sonic(config-vlan-200)# exit
sonic# configure terminal
sonic(config)# interface ethernet 0/1
sonic(config-if-0/1)# switchport access vlan 100
sonic(config-if-0/1)# exit
sonic(config)# interface ethernet 0/2
sonic(config-if-0/2)# switchport access vlan 200
sonic(config-if-0/2)# exit
sonic(config)# interface ethernet 0/0
sonic(config-if-0/0)# switchport trunk vlan 100
sonic(config-if-0/0)# switchport trunk vlan 200
sonic(config-if-0/0)# end
Step 2
Configure PC and server IP addresses.
PC-1
[root@localhost ~]# ifconfig eth0 10.0.10.11/24
[root@localhost ~]# route add default gw 10.0.10.1

PC-2
[root@localhost ~]# ifconfig eth0 10.0.11.11/24
[root@localhost ~]# route add default gw 10.0.11.1

Server-1
[root@localhost ~]# ifconfig eth0 10.0.10.101/24
[root@localhost ~]# route add default gw 10.0.10.1

Server -2
[root@localhost ~]# ifconfig eth0 10.0.11.101/24
[root@localhost ~]# route add default gw 10.0.11.1
4.2.4 Verify network configuration
Devices in the same vlan can ping each other, but devices in different vlans cannot communicate with each other.
Asterfusion CX-N & CX-M SONiC switches as the links below
CX-N series switches
CX-M series switches
If you have more technical questions, feel free to propose a ticket on our https://help.cloudswit.ch/portal/en/signin