Asterfusion Campus network implementation – Part Two Controller Installation
1 Purpose
In order to introduce the method of deploying the entire campus network using Asterusion CX-M series products and controller products, we have written a series of documents on campus network planning, installation, implementation, and testing acceptance. By reading these documents, users can easily and quickly plan and deploy the campus network online. Once the user has already planned the overall network and prepared for the launch, they can deploy the entire network online within 30 minutes. This article is the second part: Initial Installation, mainly explaining the installation work of the park network controller.
2 Controller environment preparation
The controller will be installed in the AWS cloud environment for this implementation, and the required resources are as follows:
CPU: 4 core
Memory: 8GB
Hard disk: 64GB
System version: ubuntu 20.04
3 Docker installation
The controller runs in Docker, so Docker needs to be installed. This installation is Docker version 27.0.3. The installation command is as follows:
sudo apt-get install apt-transport-https ca-certificates curl software-properties-common
curl -fsSL https://download.docker.com/linux/ubuntu/gpg | sudo apt-key add -
sudo add-apt-repository "deb [arch=amd64] https://download.docker.com/linux/ubuntu $(lsb_release -cs) stable"
sudo apt-get update
sudo apt-get install docker-ce
After successful installation, you can view version information through docker -version and status information through sudo systemctl status docker.
Note : Due to possible differences in system environment and CPU architecture, errors may occur during the installation process. Generally, following the error prompts can solve the problem and complete the installation.
4 Controller installation
4.1 Installation
1. Upload the controller image to the home directory of the cloud host.
2.Extract the controller version file using the following command:
tar -xvf controller_V1.0_R005T14.tar3.Enter the directory and install
cd ~/controller_V1.0_ R005T14/wlan-cloud-ucentral-deploy/docker-compose
sudo sh deploy-init.sh
Note:Attention should be paid to the hardware architecture of the installation environment. The X86 architecture and ARM architecture versions are different, and the corresponding controller version needs to be installed.
4.2 Configure controller IP or domain name
Enter the directory:
cd ~/controller_V1.0_ R005T14/wlan-cloud-ucentral-deploy/docker-composeExecute the following command:
sed -i "s/openwifi.wlan.local/app.cloudswitch.io/g" owsec.env owgw-ui.env owprov.env owsub.env owfms.env owgw.env owanalytics.env owprov-ui.env owrrm.envNote:Use the already applied domain app.cloudswitch.io to access the controller here. If using IP access, simply fill in the IP address.
4.3 Open the service port on the controller cloud management platform
The ports currently required for the controller are shown in the table below:
| Network Type | Direction | Strategy | Protocol | Port | Priority | Source IP | Describe |
|---|---|---|---|---|---|---|---|
| Intranet | Ingress | Accept | TCP | 16011/16011 | 1 | 0.0.0.0/0 | Operation and maintenance alarm |
| Intranet | Ingress | Accept | TCP | 16006/16006 | 1 | 0.0.0.0/0 | Subscription information |
| Intranet | Ingress | Accept | TCP | 15002/15002 | 1 | 0.0.0.0/0 | Connect device port |
| Intranet | Ingress | Accept | TCP | 16002/16003 | 1 | 0.0.0.0/0 | Gateway |
| Intranet | Ingress | Accept | TCP | 16004/16004 | 1 | 0.0.0.0/0 | Firmware service port |
| Intranet | Ingress | Accept | TCP | 16009/16009 | 1 | 0.0.0.0/0 | Analyze information |
| Intranet | Ingress | Accept | TCP | 16005/16005 | 1 | 0.0.0.0/0 | Configure service port |
| Intranet | Ingress | Accept | TCP | 16001/16001 | 1 | 0.0.0.0/0 | Authentication service port |
| Intranet | Ingress | Accept | TCP | 5912/5913 | 1 | 0.0.0.0/0 | Rtty remote connection |
| Intranet | Ingress | Accept | TCP | 443/443 | 100 | 0.0.0.0/0 | WEBUI service port |
| Intranet | Ingress | Accept | TCP | 22/22 | 100 | 0.0.0.0/0 | SSH port |
In order for the controller to operate normally, the above port authorization needs to be enabled.
Note: If IP access is used, this chapter can be ignored.
Install the certbot software in the cloud environment where the controller is installed and apply for domain name certification.
sudo snap install --classic certbot
sudo ln -s /snap/bin/certbot /usr/bin/certbot
sudo certbot certonly --manual dns-01 dns -d "*app.cloudswitch.io"
The obtained certificate is in the /etc/letsencrypt/live/cloudswitch.io/ directory.
Use the following command to copy the certificate to the corresponding directory of the controller.
sudo cp -L cert.pem /home/ubuntu/controller_V1.0_R005/wlan-cloud-ucentral-deploy/docker-compose/certs/restapi-cert.pem
sudo cp -L privkey.pem /home/ubuntu/controller_V1.0_R005/wlan-cloud-ucentral-deploy/docker-compose/certs/restapi-key.pem
sudo cp -L chain.pem /home/ubuntu/controller_V1.0_R005/wlan-cloud-ucentral-deploy/docker-compose/certs/restapi-ca.pem
5 Start Controller
Enter the directory :
cd ~/controller_V1.0_ R005T14/wlan-cloud-ucentral-deploy/docker-compose
sudo docker-compose up -d
Note: If you need to stop the controller, you can use the command sudo docker-compose down.
5.1 Install nginx and configure proxy (optional)
NOTE: The nginx agent can be installed only when needed. The controller itself has nginx components and can provide web services.
1.Install nginx components
sudo apt install nginx2.Modify the configuration file in the nginx related directory to ensure that the domain name can be correctly resolved.
5.2 Controller login
Make sure that the controller has been installed and started successfully. You can enter the corresponding IP address or domain name in the local web client to log in to the controller.
As shown below:
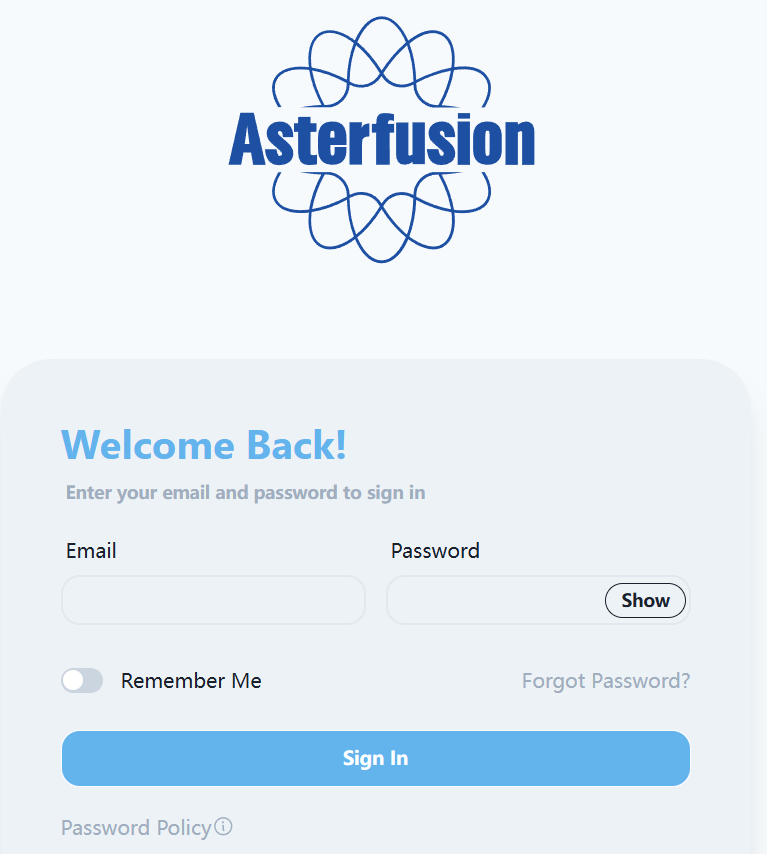
After the controller is installed for the first time, the initial login account is: tip@ucentral.com / openwifi
Be sure to change your password promptly after logging in.
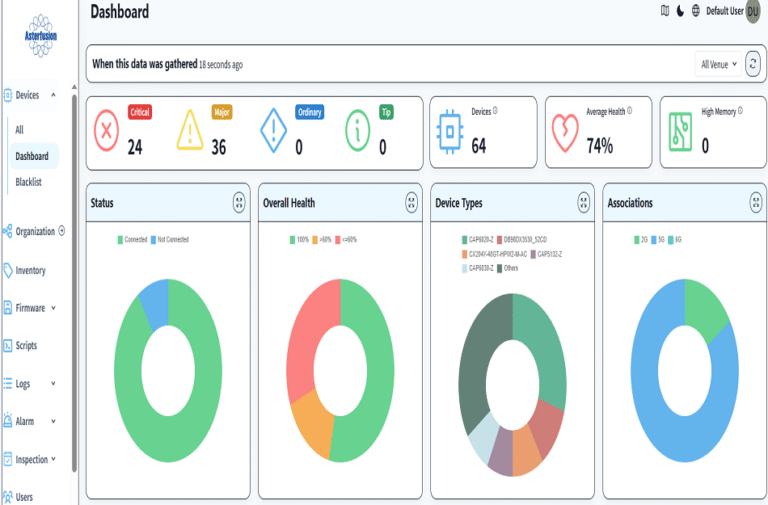
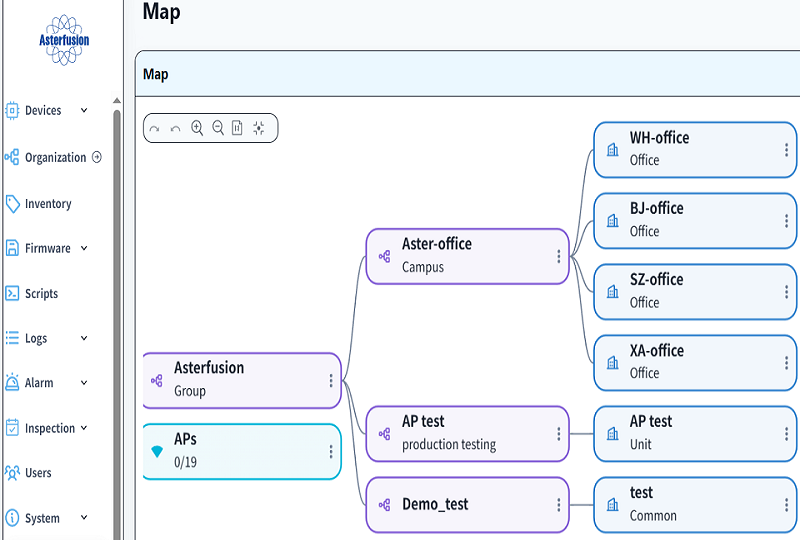
After logging in, the interface is as follows:

At this point, the installation of the campus network controller has been completed.
Asterfusion CX-N & CX-M SONiC switches as the links below
CX-N series switches
CX-M series switches
If you have more technical questions, feel free to propose a ticket on our https://help.cloudswit.ch/portal/en/signin